Monday, December 9, 2013

Creating a custom sequential workflow similar with SharePoint OOTB Approval workflow (3) custom Content Type and custom Task Edit Form


Creating a custom sequential workflow similar with SharePoint OOTB Approval workflow (1) Association / Initiation Form
Creating a custom sequential workflow similar with SharePoint OOTB Approval workflow (2) Custom Activity, While Activity and Replicator Activity
Creating a custom sequential workflow similar with SharePoint OOTB Approval workflow (3) custom Content Type and custom Task Edit Form
Creating a custom sequential workflow similar with SharePoint OOTB approval workflow (4) End on first rejection
Creating a custom sequential workflow similar with SharePoint OOTB approval workflow (5) cancel task(s) when item changed
Creating a custom sequential workflow similar with SharePoint OOTB approval workflow (6) reassign task and request change

a. Creating a custom content type.

Add custom fields to the content type: RequestMessage, ApprovalStatus, ReassignTaskTo, RequestChangeFrom, NewRequest, and DelegatedBy.

Also change the form url in <FormUrls><Display> and <FormUrls><Edit> to WorkflowForms/TaskForm.aspx, later we will talk about this custom task edit form.

Following is the Elements.xml:

<?xml version="1.0" encoding="utf-8"?>
<Elements xmlns="http://schemas.microsoft.com/sharepoint/">
<!-- Parent ContentType: Task (0x0108) -->
<Field ID="{512503F1-C067-464E-8C7A-6B915E54C378}" Name="RequestMessage" DisplayName="Request Message" Description=""
Direction="None" Type="Note" Overwrite="TRUE"
xmlns="http://schemas.microsoft.com/sharepoint/" />
<Field ID="{517B22A5-1B89-4C24-82BE-3D4FD99645BC}" Name="ApprovalStatus" MaxLength="255" DisplayName="Approval Status" Description="" Direction="None" Type="Text" Overwrite="TRUE"
xmlns="http://schemas.microsoft.com/sharepoint/" />
<Field ID="{0EBA7379-141A-4941-9E46-3DE750D84553}" Name="ReassignTaskTo" MaxLength="255" DisplayName="Reassign Task To" Description="" Direction="None" Type="Text" Overwrite="TRUE"
xmlns="http://schemas.microsoft.com/sharepoint/" />
<Field ID="{8D7CD395-204D-4E4D-BAFF-FFE2FC3C4C3E}" Name="RequestChangeFrom" MaxLength="255" DisplayName="Request Change From" Description="" Direction="None" Type="Text" Overwrite="TRUE"
xmlns="http://schemas.microsoft.com/sharepoint/" />
<Field ID="{FDA85E0C-B29C-4C59-9DE2-5D3FE74240FD}" Name="NewRequest" MaxLength="255" DisplayName="New Request" Description="" Direction="None" Type="Text" Overwrite="TRUE"
xmlns="http://schemas.microsoft.com/sharepoint/" />
<Field ID="{7F0DA0FA-C12F-415F-A990-99BC011CD34B}" Name="DelegatedBy" MaxLength="255" DisplayName="Delegated By" Description="" Direction="None" Type="Text" Overwrite="TRUE"
xmlns="http://schemas.microsoft.com/sharepoint/" />

<ContentType ID="0x0108010035c1f8f76b7a41458bcc4ee62c6a332e"
Name="myWorkflowContentType" Group="Custom Content Types"
Description="My Content Type" Version="0">
<FieldRefs>
<FieldRef ID="{512503F1-C067-464E-8C7A-6B915E54C378}" Name="RequestMessage" DisplayName="Request Message" Required="FALSE" Hidden="FALSE" ReadOnly="FALSE" PITarget="" PrimaryPITarget="" PIAttribute="" PrimaryPIAttribute="" Aggregation="" Node="" />
<FieldRef ID="{517B22A5-1B89-4C24-82BE-3D4FD99645BC}" Name="ApprovalStatus" DisplayName="Approval Status" Required="FALSE" Hidden="FALSE" ReadOnly="FALSE" PITarget="" PrimaryPITarget="" PIAttribute="" PrimaryPIAttribute="" Aggregation="" Node="" />
<FieldRef ID="{0EBA7379-141A-4941-9E46-3DE750D84553}" Name="ReassignTaskTo" DisplayName="Reassign Task To" Required="FALSE" Hidden="FALSE" ReadOnly="FALSE" PITarget="" PrimaryPITarget="" PIAttribute="" PrimaryPIAttribute="" Aggregation="" Node="" />
<FieldRef ID="{8D7CD395-204D-4E4D-BAFF-FFE2FC3C4C3E}" Name="RequestChangeFrom" DisplayName="Request Change From" Required="FALSE" Hidden="FALSE" ReadOnly="FALSE" PITarget="" PrimaryPITarget="" PIAttribute="" PrimaryPIAttribute="" Aggregation="" Node="" />
<FieldRef ID="{FDA85E0C-B29C-4C59-9DE2-5D3FE74240FD}" Name="NewRequest" DisplayName="New Request" Required="FALSE" Hidden="FALSE" ReadOnly="FALSE" PITarget="" PrimaryPITarget="" PIAttribute="" PrimaryPIAttribute="" Aggregation="" Node="" />
<FieldRef ID="{7F0DA0FA-C12F-415F-A990-99BC011CD34B}" Name="DelegatedBy" DisplayName="Delegated By" Required="FALSE" Hidden="FALSE" ReadOnly="FALSE" PITarget="" PrimaryPITarget="" PIAttribute="" PrimaryPIAttribute="" Aggregation="" Node="" />
</FieldRefs>
<XmlDocuments>
<XmlDocument NamespaceURI="http://schemas.microsoft.com/sharepoint/v3/contenttype/forms">
<FormTemplates xmlns="http://schemas.microsoft.com/sharepoint/v3/contenttype/forms">
<Display>ListForm</Display>
<Edit>ListForm</Edit>
<New>ListForm</New>
</FormTemplates>
</XmlDocument>
<XmlDocument NamespaceURI="http://schemas.microsoft.com/sharepoint/v3/contenttype/forms/url">
<FormUrls xmlns="http://schemas.microsoft.com/sharepoint/v3/contenttype/forms/url">
<Display>WorkflowForms/TaskForm.aspx</Display>
<Edit>WorkflowForms/TaskForm.aspx</Edit>
</FormUrls>
</XmlDocument>
</XmlDocuments>
<Forms>
<Form Type="DisplayForm" Url="DispForm.aspx" SetupPath="pages\form.aspx" WebPartZoneID="Main" />
<Form Type="EditForm" Url="EditForm.aspx" SetupPath="pages\form.aspx" WebPartZoneID="Main" />
<Form Type="NewForm" Url="NewForm.aspx" SetupPath="pages\form.aspx" WebPartZoneID="Main" />
</Forms>
</ContentType>
</Elements>

Please see: Creating a custom sequential workflow similar with SharePoint OOTB Approval workflow (2) Custom Activity, While Activity and Replicator Activity.
In this article, there is a custom activity, the activity class declared many properties such as TaskTitle , TaskDescription , RequestMessage, ApprovalStatus, DelegatedBy, NewRequest, …, they are passed in/out from/to outside parent activity. We also need to pass these fields in/out from/to task edit form by the custom fields included in this content type.
For example, in createSPTaskWithContentType activity, we pass RequestMessage, DelegatedBy and NewRequest to the content type fields(included in the task list item) by following code:

SPTaskProperties.ExtendedProperties[RequestMessageGuid] = ((SPTaskActivity)((Activity)sender).Parent).RequestMessage;
SPTaskProperties.ExtendedProperties[DelegatedByGuid] = ((SPTaskActivity)((Activity)sender).Parent).DelegatedBy;
SPTaskProperties.ExtendedProperties[NewRequestGuid] = ((SPTaskActivity)((Activity)sender).Parent).NewRequest;

These data will be picked up in task edit form.
The ContentType ID starts with 0x010801, which means this content type is derived from Workflow Task.
This ContentType ID is assigned to the task ContentTypeId in createSPTaskWithContentType activity.
Set this content type as a site collection feature.

b. Being able to associate workflow with any tasks list.

In this workflow’s association form, work on the code behind file.
Create a method AddContentTypeToTaskList() as following:

private void AddContentTypeToTaskList()
{
    SPSecurity.RunWithElevatedPrivileges(delegate()
    {
        Web.AllowUnsafeUpdates = true;
        SPContentType TestDataCT = Web.AvailableContentTypes["myWorkflowContentType"];
        SPList TaskList = Web.Lists[(this.associationParams.TaskListGuid)];
        SPContentType ExistCT = TaskList.ContentTypes["myWorkflowContentType"];
        if (ExistCT == null)
        {
            TaskList.ContentTypesEnabled = true;
            TaskList.Update();
            TaskList.ContentTypes.Add(TestDataCT);
            TaskList.Update();
            SPContentTypeCollection listCTs = TaskList.ContentTypes;
            System.Collections.Generic.List<SPContentType> result = new System.Collections.Generic.List<SPContentType>();
            foreach (SPContentType ct in listCTs)
            {
                if (ct.Name.Contains("myWorkflowContentType"))
                {
                    result.Add(ct);
                }
            }
            TaskList.RootFolder.UniqueContentTypeOrder = result;
            TaskList.RootFolder.Update();
        }
    });
}

Add it to Associate Workflow button click event handler, the code looks like following:

protected void AssociateWorkflow_Click(object sender, EventArgs e)
{
    // Optionally, add code here to perform additional steps before associating your workflow
    try
    {
        CreateTaskList();
        CreateHistoryList();
        HandleAssociateWorkflow();
        AddContentTypeToTaskList(); SPUtility.Redirect("WrkSetng.aspx", SPRedirectFlags.RelativeToLayoutsPage, HttpContext.Current, Page.ClientQueryString);
    }
    catch (Exception ex)
    {
        SPUtility.TransferToErrorPage(String.Format(CultureInfo.CurrentCulture, workflowAssociationFailed, ex.Message));
    }
}

When user selects any task list or a new task list in association form, and click Associate Workflow button, myWorkflowContentType will be assigned to this task list.

c. Applying custom task edit form.

Create a custom task edit form, see this article: Walkthrough: Creating a simple Sequential Workflow with a custom Task Form in SharePoint 2010 using Visual Studio 2010 (Part 1 of 2).
In this task edit form’s page load event, get all the necessary data by this code: SPListItem item = SPContext.Current.ListItem, this is the task list item, the custom Content Type myWorkflowContentType is included in this item.
add code to display different task information according to it is for approval or change request.
Following is the code for button Approve, Reject and Cancel:

protected void btnApprove_Click(object sender, EventArgs e)
{
    SPList l = SPContext.Current.List;
    SPListItem li = SPContext.Current.ListItem;
    li[SPBuiltInFieldId.TaskStatus] = "Completed";
    li[SPBuiltInFieldId.PercentComplete] = 1;
    li["ApprovalStatus"] = "1";
    SaveButton.SaveItem(SPContext.Current, false, "");
    CloseForm();
}

protected void btnReject_Click(object sender, EventArgs e)
{
    SPList l = SPContext.Current.List;
    SPListItem li = SPContext.Current.ListItem;
    li[SPBuiltInFieldId.TaskStatus] = "Completed";
    li[SPBuiltInFieldId.PercentComplete] = 1;
    li["ApprovalStatus"] = "2";
    SaveButton.SaveItem(SPContext.Current, false, "");
    CloseForm();
}

protected void btnCancel_Click(object sender, EventArgs e)
{
    CloseForm();
}

The code for button Reassign Task and Change Request will be shown later when we talk about the topic.

Monday, December 2, 2013

Creating a custom sequential workflow similar with SharePoint OOTB Approval workflow (2) Custom Activity, While Activity and Replicator Activity


Creating a custom sequential workflow similar with SharePoint OOTB Approval workflow (1) Association / Initiation Form
Creating a custom sequential workflow similar with SharePoint OOTB Approval workflow (2) Custom Activity, While Activity and Replicator Activity
Creating a custom sequential workflow similar with SharePoint OOTB Approval workflow (3) custom Content Type and custom Task Edit Form
Creating a custom sequential workflow similar with SharePoint OOTB approval workflow (4) End on first rejection
Creating a custom sequential workflow similar with SharePoint OOTB approval workflow (5) cancel task(s) when item changed
Creating a custom sequential workflow similar with SharePoint OOTB approval workflow (6) reassign task and request change

To create a workflow dynamically handling multiple stages for multiple approvers in parallel mode or serial mode, we do following steps:

a.     Creating a custom activity
Create a new Class File and Inherit System.Workflow.Activities.SequenceActivity, then we will have the designer UI and name it SPTaskActivity, place CreateTaskWithContentType, OnTaskChanged and CompleteTask activities.
We will create a custom task edit form and some custom fields in the tasks list for approval later, so we use CreateTaskWithContentType instead of CreateTask. We will talk about this topic later on.


Set CorrelationToken as "taskToken" and OwnerActivityName as “SPTaskActivity”.
In order to allow properties to be passed in/out from/to outside parent activity, we need to declare necessary properties. Following is the code snippet:


using System.Workflow.Activities;
using System.Workflow.ComponentModel;
using System.ComponentModel;
using System.ComponentModel.Design;
using System.Workflow.ComponentModel.Design;

namespace SPTaskActivity
{
    public partial class SPTaskActivity : SequenceActivity
    {
           public string TaskTitle { get; set; }
         public string TaskDescription { get; set; }
           public string TaskAssignedTo { get; set; }
         public string RequestMessage { get; set; }
              ……

After completing the coding on each activity, build the application. Now a new custom activity will be available in your toolbox.

b.     Creating a workflow
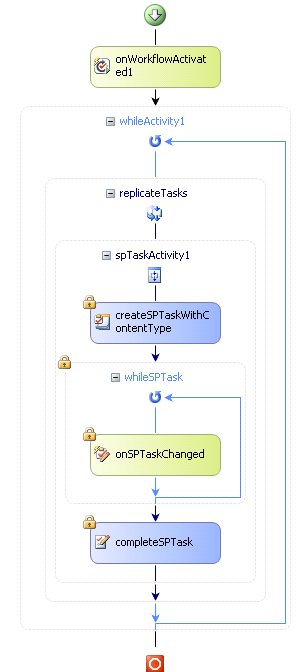
Now go back to the project and create a workflow, add activities like following, drag the SPTaskActivity from your toolbox and drop it inside your replicateTasks.


From previous article, Creating a custom workflow similar with SharePoint OOTB Approval workflow (1) Association Form / Initiation Form, we have the stages data in workflow’s stages IList, every item is a string of users login name separated by comma, the last letter of this string is a letter “P” or “S” also separated by comma indicating this stage is in parallel mode or serial mode.

The whileActivity1 in workflow diagram is for stages.
Set the Condition property to Code Condition, and specify following method:

private void notComplete(object sender, ConditionalEventArgs e)
            {
                assignees = new ArrayList();
                if ((i_while < stages.Count) && Approved)
                {
                    string[] uids = stages[i_while].ToString().Split(',');
                    ArrayList _AssignTo = new ArrayList();
                    _AssignTo.AddRange(uids);
                    _AssignTo.RemoveAt(_AssignTo.Count - 1);
                    ArrayList _AssignToUsers = CommonUtilities.UserList(_AssignTo, workflowProperties.Web);
                    if (_AssignToUsers.Count > 0)
                    {
                        for (int i = 0; i < _AssignToUsers.Count; i++)
                        {
                            assignees.Add(_AssignToUsers[i].ToString());
                        }
                        replicateTasks.InitialChildData = assignees;
                        if (uids[uids.Length - 1] == "P")
                        {
                            replicateTasks.ExecutionType = ExecutionType.Parallel;
                        }
                        else
                        {
                            replicateTasks.ExecutionType = ExecutionType.Sequence;
                        }
                    }
                    e.Result = !complete;
                }
                else
                {
                    e.Result = complete;
                }
                i_while = i_while + 1;
            }

In above code, replicateTasks is assigned with approvers in each stages, and replicateTasks.ExecutionType is ExecutionType.Parallel or ExecutionType.Sequence depending on the last letter of the string.
The initial value of i_while is 0, CommonUtilities.UserList() is a method to pick up every single user if the entity is a SharePoint group. _AssignTo.RemoveAt(_AssignTo.Count - 1) is to remove the last letter of this string (“P” or “S”);
Boolean variable Approved is used to stop the process if any approval task is rejected.

The replicateActivity1 in workflow diagram is for approvers in serial and parallel mode.

    private void replicatorActivity1_Initialized(object sender, EventArgs e)
    {
        if (assignees.Count > 0)
        {
            spTaskActivity1.TaskAssignedTo = assignees[assignees.Count - 1].ToString();
            spTaskActivity1.TaskTitle = WorkflowConst.TaskTitle + workflowProperties.Item.Title;
            spTaskActivity1.TaskDescription = WorkflowConst.TaskDescription;
            spTaskActivity1.ApprovalStatus = "0";
            spTaskActivity1.RequestMessage = RequestMessage;
        }
    }

    private void replicatorActivity1_ChildInitialized(object sender,  ReplicatorChildEventArgs e)
    {
        ((SPTaskActivity.SPTaskActivity)e.Activity).TaskAssignedTo = e.InstanceData.ToString();
        ((SPTaskActivity.SPTaskActivity)e.Activity).TaskTitle = WorkflowConst.TaskTitle + workflowProperties.Item.Title;
        ((SPTaskActivity.SPTaskActivity)e.Activity).TaskDescription = WorkflowConst.TaskDescription;
        ((SPTaskActivity.SPTaskActivity)e.Activity).ApprovalStatus = "0";
        SPRegionalSettings oRegionalSettings = workflowProperties.Web.RegionalSettings;
        SPTimeZone oTimeZone = oRegionalSettings.TimeZone;
        ((SPTaskActivity.SPTaskActivity)e.Activity).RequestMessage = WorkflowConst.ApprovalStartedBy + workflowProperties.OriginatorUser.Name + WorkflowConst.On + oTimeZone.UTCToLocalTime(workflowProperties.Workflow.Created).ToString() + " Comment: " + RequestMessage;
    }
The custom activity is wrapped in two level loops, While Activity and Replicator Activity, this is Spawned Contexts. So we need to use the event parameter to reference the custom activity properties to pass parameters.


Monday, November 18, 2013

Creating a custom sequential workflow similar with SharePoint OOTB Approval workflow (1) Association / Initiation Form


Creating a custom sequential workflow similar with SharePoint OOTB Approval workflow (1) Association / Initiation Form
Creating a custom sequential workflow similar with SharePoint OOTB Approval workflow (2) Custom Activity, While Activity and Replicator Activity
Creating a custom sequential workflow similar with SharePoint OOTB Approval workflow (3) custom Content Type and custom Task Edit Form
Creating a custom sequential workflow similar with SharePoint OOTB approval workflow (4) End on first rejection
Creating a custom sequential workflow similar with SharePoint OOTB approval workflow (5) cancel task(s) when item changed
Creating a custom sequential workflow similar with SharePoint OOTB approval workflow (6) reassign task and request change

a.     To dynamically enter multiple stages for multiple approvers in parallel mode or serial mode in Association/Initiation form by user, we have following association form (initiation form is the same):


DateTime related functions (such as  Due Date, Duration Per Task, …) are not included.
The “Approvers” control is a GridView, the “Assign To” control is a SharePoint PeopleEditor, the “Order” control is a DropDownList, and the Request control is a MultiLine TextBox.
This page is kind of a regular Asp.Net page, so I will not show all the detailed code here.

b.    To pass stages and approvers information from Association/Initiation form to approval workflow, we need to update the form’s GetAssociationData()/GetInitiationData() method by using  SerializeData.SerializeFormToXML method.
The approvers(Assign To and order) is a dynamic array that grows and reduces as needed. Following is the code snippet:

     public class Stages
    {
        public String AssignedTo = default(string);
        public String Order = default(string);
    }

    [Serializable]
    public class MyCustomData : IDisposable
    {
        private bool disposed = false;
        private string _request = default(string);

        public string Request
        {
            get { return _request; }
            set { _request = value; }
        }

        private List<Stages> _stages = new List<Stages>();

        public List<Stages> Stages
        {
            get { return _stages; }
            set { _stages = value; }
        }

        public void Dispose()
        {
            Dispose(true);
            GC.SuppressFinalize(this);
        }

        protected virtual void Dispose(bool disposing)
        {
            if (!this.disposed)
            {
                if (disposing)
                {
                    // Dispose managed resources.
                    //component.Dispose();
                }
                disposed = true;
            }
        }
    }

    public class SerializeData
    {
        //serailize data to XML
        public static string SerializeFormToXML(MyCustomData data)
        {
            XmlSerializer serializer = new XmlSerializer(typeof(MyCustomData));
            using (StringWriter writer = new StringWriter())
            {
                serializer.Serialize(writer, data);
                return writer.ToString();
            }
        }
    }

Update the association form’s GetAssociationData() as following( for initiation form, it is GetInitiationData()):

private string GetAssociationData()
{
            // TODO: Return a string that contains the association data that will be passed to the workflow. Typically, this is in XML format.
            //return string.Empty;

            MyCustomData assocForm = new MyCustomData();
            assocForm.Request = txtRequest.Text;
            Stages myStage = null;
            DataTable dtCurrentTable = (DataTable)ViewState["CurrentTable"];
            for (int i = 0; i < Gridview1.Rows.Count; i++)
            {
                PeopleEditor myPE = (PeopleEditor)Gridview1.Rows[i].FindControl("taskAssignedToPicker");
                DropDownList myOrder = (DropDownList)Gridview1.Rows[i].FindControl("Order");
                if (myPE.ResolvedEntities.Count > 0)
                {
                    myStage = new Stages();
                    for (int j = 0; j < myPE.ResolvedEntities.Count; j++)
                    {
                        PickerEntity selectedEntity = (PickerEntity)myPE.ResolvedEntities[j];
                        myStage.AssignedTo = myStage.AssignedTo + selectedEntity.Key + "," + selectedEntity.EntityType + ",";
                    }
                    myStage.Order = myOrder.SelectedValue;
                    assocForm.Stages.Add(myStage);
                }
            }
            return SerializeData.SerializeFormToXML(assocForm);
        }

We can see selectedEntity.EntityType is appended to field AssignedTo, this is to identify if the selectedEntity.Key is a single user or a group. Later on, we will see the code for each group entered, assign a task to every member of that group(topic d).
Following code snippet shows how the workflow gets the Association/Initiation data in workflow:

    public sealed partial class ApprovalWorkflow : SequentialWorkflowActivity
    {
        public ApprovalWorkflow()
        {
            InitializeComponent();
        }

       public Guid workflowId = default(System.Guid);
       public SPWorkflowActivationProperties workflowProperties = new SPWorkflowActivationProperties();
        public IList stages = default(System.Collections.IList);

        private void onWorkflowActivated1_Invoked(object sender, ExternalDataEventArgs e)
       {
            XmlSerializer serializer = new XmlSerializer(typeof(MyCustomData));
            XmlTextReader reader = new XmlTextReader(new StringReader(workflowProperties.InitiationData));
            stages = new ArrayList();
            using (MyCustomData initData = serializer.Deserialize(reader) as MyCustomData)
            {
                foreach (Stages myStage in initData.Stages)
                {
                    stages.Add(myStage.AssignedTo + myStage.Order);
                }
                RequestMessage = initData.Request;
            }
        }

c.     Every time when the association/Initiation form is loaded, check The association data, if it is not null, populate existing association data to the form:

SPWorkflowAssociation association = this.workflowList.WorkflowAssociations[new Guid(this.associationGuid)];
            if (association!= null)
            {
                XmlSerializer serializer = new XmlSerializer(typeof(MyCustomData));
                XmlTextReader reader = new XmlTextReader(new StringReader(association.AssociationData));
                ArrayList stages = new ArrayList();
                string RequestMessage = "";
                using (MyCustomData assocData = serializer.Deserialize(reader) as MyCustomData)
                {
                    foreach (Stages myStage in assocData.Stages)
                    {
                        //Populate association data to this form.
                    }
                        RequestMessage = assocData.Request;
                }
            }

d.    For each group entered, assign a task to every member of that group. Following is the method to pick up every single user from groups, the parameter _AssignTo is an ArrayList, the items are login name followed by user type:

        public static ArrayList UserList(ArrayList _AssignTo, SPWeb myWeb)
        {
            ArrayList UserList = new ArrayList();
            if (_AssignTo.Count > 1)
            {
                for (int j = 0; j < _AssignTo.Count; j = j + 2)
                {
                    if (_AssignTo[j + 1].ToString() == "User")
                    {
                        SPUser singlevalue = myWeb.AllUsers[_AssignTo[j].ToString()];
                        if (!UserList.Contains(singlevalue.LoginName))
                        {
                            UserList.Add(singlevalue.LoginName);
                        }
                    }
                    else
                    {
                        SPGroup group = myWeb.Groups[_AssignTo[j].ToString()];
                        foreach (SPUser user in group.Users)
                        {
                            // add all the group users to the list
                            if (!UserList.Contains(user.LoginName))
                            {
                                UserList.Add(user.LoginName);
                            }
                        }
                    }
                }
            }
            return UserList;
        }

After all of above steps, we have the stages data in workflow’s stages IList, every item is a string of users login name separated by comma, the last letter of this string is a letter “P” or “S” also separated by comma indicating this stage is in Parallel mode or Serial mode.

Thursday, August 2, 2012

Get selected Lookup field value in SharePoint 2010

SPFieldLookup myField = myItem[i].Fields["LookupFieldName"] as SPFieldLookup;

SPFieldLookupValue myLookupValue = myField.GetFieldValue(myItem[i]["LookupFieldName"].ToString()) as SPFieldLookupValue;

string LookupFieldValue = myLookupValue.LookupValue;

Monday, July 16, 2012

Remove unwanted item in SharePoint 2010 Navigation Up Menu

I created several web part pages and put them to the site's document library("SitePages"):

http://mysite.com/worksite/SitePages/workpage1.aspx
http://mysite.com/worksite/SitePages/workpage2.aspx
...

Then I configured navigation to the pages.
When I navigate to any one of the pages, click the Navigate Up button, I can see the following hierarchy menu:

Home -> worksite -> SitePages -> workpage?.aspx

The "SitePages" is the name of a document library, I don't want it to show to the client, I need to remove this item from the hierarchy menu. I have done this as following.

Getting the HTML code by "View source", search string "SitePages" (the document library name), we will find following code snippet:

<ul class="s4-breadcrumb">
        <li class="s4-breadcrumbRootNode"><span class="s4-breadcrumb-arrowcont"><span style="height: 16px;
            width: 16px; position: relative; display: inline-block; overflow: hidden;" class="s4-clust s4-breadcrumb">
            <img src="/_layouts/images/fgimg.png" alt="" style="border-width: 0px; position: absolute;
                left: -0px !important; top: -353px !important;" />
        </span></span><a class="s4-breadcrumbRootNode" href="/">Home</a><ul class="s4-breadcrumbRootNode">
            <li class="s4-breadcrumbNode"><span class="s4-breadcrumb-arrowcont"><span style="height: 16px;
                width: 16px; position: relative; display: inline-block; overflow: hidden;" class="s4-clust s4-breadcrumb">
                <img src="/_layouts/images/fgimg.png" alt="" style="border-width: 0px; position: absolute;
                    left: -0px !important; top: -353px !important;" />
            </span></span><a class="s4-breadcrumbNode" href="/worksite">worksite</a><ul
                class="s4-breadcrumbNode">
                <li class="s4-breadcrumbNode"><span class="s4-breadcrumb-arrowcont"><span style="height: 16px;
                    width: 16px; position: relative; display: inline-block; overflow: hidden;" class="s4-clust s4-breadcrumb">
                    <img src="/_layouts/images/fgimg.png" alt="" style="border-width: 0px; position: absolute;
                        left: -0px !important; top: -353px !important;" />
                </span></span><a class="s4-breadcrumbNode" href="http://mysite.com/worksite/_layouts/listform.aspx?ListId=%7B8CF0AC51%2D1703%2D4126%2DAE21%2DB60CF69F6EBE%7D&amp;PageType=0">
                    SitePages</a><ul class="s4-breadcrumbNode">
                        <li class="s4-breadcrumbCurrentNode"><span class="s4-breadcrumb-arrowcont"><span
                            style="height: 16px; width: 16px; position: relative; display: inline-block;
                            overflow: hidden;" class="s4-clust s4-breadcrumb">
                            <img src="/_layouts/images/fgimg.png" alt="" style="border-width: 0px; position: absolute;
                                left: -0px !important; top: -353px !important;" />
                        </span></span><span class="s4-breadcrumbCurrentNode">workpage?</span></li></ul>
                </li>
            </ul>
            </li>
        </ul>
        </li>
    </ul>

We can see "SitePages" is at the third level of the hierarchy menu.
What we need to do is: first, get the current level DOM("SitePages") node, second, get the upper level and forth level DOM node, and then replace the third level node with forth level node.
Following is the javascript code:

<script type="text/javascript" language="javascript">
  var x = document.getElementsByTagName("a")
  var i=0;
  for (i=0;i<x.length;i++)
  {
    if (x[i].className=="s4-breadcrumbNode")
    {
     if (x[i].innerHTML=="SitePages")
     {
         var parent1=x[i].parentNode.parentNode;

         var parent2=parent1.parentNode;

         var child1=parent1.lastChild;

         var child2=child1.lastChild;

         parent2.replaceChild(child2,parent1);

      }
    }
  }
</script>

Put the javascript to a Notepad file and upload it to the site's document library, then add a Content Editor web part to the web part page, in Edit Web Part, enter the Content Link with the uploaded javascript file url, then the "SitePages" item is removed from the Navigation Up hierarchy menu.

Thursday, July 5, 2012

Get Created By user information from list item

SPUser ItemCreatedby =
new SPFieldUserValue(SPContext.Current.Web, myItems[i]["Author"].ToString()).User;

Tuesday, May 1, 2012

Error: "The sandboxed code execution request was refused because the Sandboxed Code Host Service was too busy to handle the request"

I created a Sandboxed Solution on SharePoint 2010 including one web part and three event receivers registered to one list's ItemAdded, ItemDeleting and ItemUpdated. The web part has a delete button used to delete the list's items.

I deployed the sandboxed solution package to the site collection, when I click delete button on the web part, the error message: "The sandboxed code execution request was refused because the Sandboxed Code Host Service was too busy to handle the request"

I googled this message, most of the articles suggest to check if the Microsoft SharePoint Foundation Sandboxed Code Service is running on Central Admnistration and other settings on the system, the approaches didn't work for me.

I put one web part and three event receivers to seperate features, I found if I deactivate the ItemDeleting event receiver feature, the web part works well without any problem. Obviously the web part deleting fires the ItemDeleting event receiver.

So I need to disable the ItemDeleting event firing from the web part deleting code. I created one column on the list as a flag, it is set in the web part code. if this flag is found in the ItemDeleting event, just ignore the event.

I deployed and tested the project on my dev machine, the error message is gone, it's working well. When I deployed it to another SharePoint server, the same error message was back.

Then I google the following solution

//Code in delete button of the web part.
using (new DisabledItemEventsScope())
{
 //Code to delete the items.
}

public class DisabledItemEventsScope : SPItemEventReceiver, IDisposable
{
        private bool eventFiringEnabledStatus;
        public DisabledItemEventsScope()
        {
            eventFiringEnabledStatus = base.EventFiringEnabled;
            base.EventFiringEnabled = false;
        }
        #region IDisposable Members
        public void Dispose()
        {
            base.EventFiringEnabled = eventFiringEnabledStatus;
        }
        #endregion
}

I applied this code to my project and deployed the project, the error message is gone and everything is working well.